Thursday, April 9, 2009

The sugar bush


This might not be real interesting, but it is informative. I had my daughter take some pics at the sugar bush tonight when they went to unload sap...
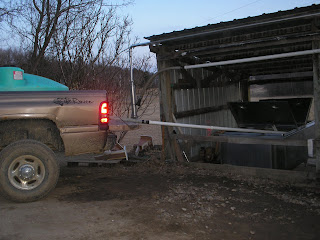
Lots of neighbors take their sap to this sugar bush. Here we are backed up to the stainless tanks that will allow us to measure our sap. As it is unloaded, we also take a sample of the sap, which will be sent through a little machine that reads the sugar content.


The white PVC transfers the sap to the tank. At the end of the PVC is a sock that filters crud out of the sap as it gets dumped.


Here is the little reader that tells us the sugar content of the sap. This tells the sweetness. Much of the sap this year reads a 30:1 sugar content, so for every 30 gallons of sap, you will get 1 gallon of syrup.


This is Merlin's evaporator. First, he runs the sap through a reverse osmosis machine and removes a good share of the water, then he cooks it down and stores it in barrels. It's a sticky job.


This is where the sap comes out of the evaporator. It's really hot!! This is set up to automatically draw off the sap as it reaches the right time.


That is Merlin. He looses a lot of sleep this time of year. But sticky, sweet, and loosing sleep, it's a great job!

Sunday, April 5, 2009

Sugar Snow

This is what we woke up to this morning, after a great muddy week here in Northwest Wisconsin.


This is called a sugar snow, and it gets its name from the timeliness of the event. We are Wisconsin Sap suckers, those of us who tap maple trees for their bounty of sap for Maple Syrup...This dusting of snow will boost the sap and actually tell the trees to give us more! It's a great event, even though we are tired of this white stuff. Kids got up and said, "oohhaww" which, roughly translated means they are equally sick of the snow.

I, personally, don't like mud, which is prevelant in the spring. The milk truck comes up our driveway and sinks, and makes ruts up to 18" deep. I am SO glad we don't have to deal with dirt roads to much. I tore the exhaust off my poor jeep last week! It is not fun. My sewing customers have had to walk up the driveway for a while now. Doesn't seem to phase them, however. Spring is indeed in the air.


Here are a few more pics, then it's off to Northern MN for the day. My brother lives in Milaca and he says there is no snow there. They are grilling out today. MMMMMM. Obviously I am NOT grilling out today...Or riding bike...I could make a snowman.


Saturday, March 28, 2009

Wine racking 101

Hey all, been really busy and no computer for a while. Sorry. Well, here is the long-awaited wine racking procedure.


Here is my 5-gallon carboy full of raspberry-apple wine. Time to siphon it off and add stabilizer and sparkloid powder...


After I do this, it takes a couple weeks before I can bottle it. This is the 3rd racking, but the first time I have added these ingredients. This wine is nearly done, except for clearing and bottling. I had three kinds going at once this winter...Raspberry-Apple, Wild Grape, and Raspberry. I only got 3 gallons of raspberry, which I am actually making for a friend who has a longing for scratched arms and mosquito bites. And a passion for raspberries!


Here are the jugs of the other kinds. The wild grape is still working, and also the best tasting at this time. The one with the expanded balloon is the grape. I sometimes use balloons because it gives me a better indication of when the yeast is done working. When the balloon goes down, the wine is usually done. Here are the two wines, side by side. I have racked them and added clarifier and stabilizer, along with a bit more sugar. The wines I make are very dry. Most of the people in my hubbies family like sweeter wine, therefore I sweeten it up a bit. I was most successful at white grape and honey wine last year. I also made 2 kinds of strawberry, neither of which I liked. I didn't really know how to make wine last year, and I didn't add the right ingredients. Some of the strawberry exploded in the basement!!!


After adding the sugar, my grape wine started working again, and started bubbling. That won't last. Neither will this wine. Want some???


Too bad I can't sell this stuff! Against the law and all that. I did make some great labels, however, and included the alcohol content...13% by volume. Plus a warning about drinking responsibly, and returning my bottles!
I give all my wine away at Christmas, anniversaries, and family functions. The joy is in the making and the giving. Not everyone likes my homebrew, but they are just so used to the boxed garbage that their tastebuds have become immune to the good stuff. My husband calls it my "science experiment". He only likes it if he adds enough maple syrup to kill the taste. He figures it should taste like, Lord forbid, grapes, or strawberries, or fruit. I just told him to buy fruit juice if that's what he wants!!! Here is the finished product, although the clarifier and stabilizer make it a bit cloudy...


This doesn't show off anything special, just the raspberry wine bottled, no label.


It is just the leftovers from racking; the stuff that didn't fit in the gallon jugs, because I added a bit of sugar water to sweeten this wine a bit. We get to drink it tonight!

Here is the sludge on the bottom of the jug. This is the lees. It is the dead yeast cells.
Now, if you are ready to try this at home, here are a few sites you will find helpful. One is
http://www.midwestsupplies.com/ , where I get all my supplies. Very good place to purchase from. The other is http://winemaking.jackkeller.net/ , a great place to start looking at recipes.
Well, that is the extent of my knowledge. Everything gets better with time, including your ability to make wine. I am hoping to eventually bottle some and enter it in a contest. Or not.
Have a good time looking at those sites. You can get lost in there....

Wednesday, March 4, 2009

I am a new Auntie!!!!!!!!!


Introducing my newest nephew, Hudson Nathanial. Scott and Bhan's baby born 2/28/2009. He shares Luke's birthday, for all you geneology buffs and family members.

One of these days I'll get ambitious and post them all...there's been plenty...and they are mostly boys. What the heck; the Milkman's wife has that boy problem too. I grew up with a family that had 8 sons. Now wouldn't you think one of us girls woulda had something to choose from there??? No way. We had to go searching for our knight in shining armor. Thank heaven mine rode in on a horse*snicker*.

Sunday, March 1, 2009

Kue Semprong (Crispy Sweet Rolls)

Well, what do YOU do on Sunday? Find someone who wants to bake, of course! This isn't just any baking day, however, it is part of my daughter's 6th grade Taste of the Hemisphere project.

Each student and partner pick a country, then make a presentation...to the whole town and then some!! Yep, there are approximately 150-200 people who attend this event each year, held by our 6th graders. The students dress in the traditional clothing of their country, write a report, make a 3-D project, color a banner, present a flag, and of course...make some FOOD! The country we have is Indonesia and the food we picked is Kue Semprong, a type of appetizer. So, these are the ingredients, simple enough. Since we couldn't find any rice flour, we settled for cream of rice hot cereal and put it in a blender until it made flour. That part worked GREAT! Then, you mix that with the sugar. Then you add the beaten eggs and mix well. Next add the coconut milk and the cinnamon. It should be thinner than pancake batter, but not much.


Now, you have to figure out how to cook the darn stuff. Not a problem if you have the two-sided flat irons that are used in Indonesia, but the closest thing we come to that is a waffle iron, which won't work. You see, traditional Kue Semprong have etchings in the flat griddles and they work a lot like an over-the-fire sandwich maker, you know...for camping. So, I had a Hillshire farms iron skillet, and another with a flat bottom, and we compromise. I heated both equally on their own burners, so it was like an open flame, and ta-da! Instant sandwich maker. Watch as we make these yummy treats...
First, you have to heat the skillets, then spray the bottoms of each. Very important because you can't have this stuff stick to either skillet.


Then, you pour about 1/8 cup of the batter onto the skillet with the impression. I did a very bad thing here when I put the hot pad on the burner. NEVER DO THIS AT HOME. I actually used it under the handle of the 2nd skillet so I didn't burn my hand. Iron skillets get hot all over!


Then, you put the other heated skillet over the top. Look at the above picture and you will see the skillet heating on the other burner. Keep them like this for a couple minutes; if you did it right, they will brown, and the skillet's impression will brown onto the "sweet roll".


If your top isn't very brown, just flip it for 30 seconds or so and it will become browned. Flip it back and begin rolling it either on the skillet or on a plate. This part has to be done right away, because they cool fast and into whatever shape you have given them. They are usually rolled, like this:


Then, they are served whole, dipped in chocolate or filled with filling. Ours are plain, and we cut them in half. Our recipe makes 50, so I quadrupled it to make at least 200 "rolls".


Can you see the Hillshire Farms impression?

Traditional Indonesians' griddles are made with impressions that identify the maker. Here is the bowlful of bounty. They taste like cinnamonny corn bread pancakes, and I liked them better hot and soft, although cold and crunchy isn't bad.


Here is the recipe, in case anybody wants to have a go at it. For a first attempt we did rather well, and only had to feed one to the dog!! He likes them as well. LOL.

Kue Semprong:

9 1/8 oz rice flour

5 1/4 oz granulated sugar

4 eggs, beaten well

1/2 tsp cinnamon powder

1/2 can coconut milk

Mix the flour and sugar thoroughly. Add beaten eggs, stir well. Pour the coconut milk and the cinnamon into the flour mixture. Stir well.

Heat the cookie mold over a low flame, grease with cooking oil. Put a small circle of batter onto the mold and close the mold. Bake over a low flame on each side until browned, about 5 minutes. Roll it right away. Cool on rack. Makes 50 rolls.

Anyone who wants the original recipe and side notes, it can be found at http://fooddownunder.com

Listed under Kue Semprong

Happy Cooking!!!!!!!!!!!!!!!!